Reloading Subsonic .30-30 Win - Reloading Cycle
2025 update: it’s been a few years since I wrote this article, and as I got more experience with reloading and long range shooting, I feel the need to say this: this series of articles presents a reloading process which is fine for this kind of shooting (i.e. recreational, fun shoot), but which lacks several steps and tools for a state of the art reloading. Be aware of this when reading this series of articles.
DISCLAIMER: make sure to wear ears and eyes protections when manipulating bullets or bullet components (powder, primers, etc.). I do not assume any liability for any damage or injury resulting from the use of this information.
I’ll present on this page my typical reloading cycle. Keep in mind it is not perfect, and it will never be. Depending on your needs, tools and preferences at the time, your reloading process will change.
Again, make sure to wear ears and eyes protection: a primer could explode to your face while seating it into a case, you could project some citric acid in your eyes while washing the cases, etc. Be safe!
Make sure you read this page before: The tools you need.
Step 1: deprime the cases #
Once you shot your cartridges, the first step will be to deprime the cases. It can be done either with a:
Step 2: wash the cases #
I personally use a wet tumbler (the Frankford Arsenal Rotary Tumbler Lite).
- Put the stainless steel media into the tumbler.
- Put the deprimed cases into the tumbler.
- Fill it with water.
- Add a few drops of dish washing liquid.
- Add a teaspoon of citric acid monohydrate.
- Turn on the tumbler and leave it for an hour or two.
Step 3: separate the media from the cases #
You can use your media separator (e.g. Frankford Arsenal Wet/Dry Media Separator) if you have one, or do it by hand. Make sure not to lose too much of your stainless media because it’s expensive! Retrieve the stainless media, dry it with a towel and leave it in the tumbler for next time.
Step 4: dry the cases #
You can either dry the cases by hand with a towel and leave it overnight or use a case dryer such as the Lyman Cyclone Case Dryer (which has a timer feature: up to 3 hours of drying). Whichever method you choose, make sure to check there is not a single drop of water in your case when you load it.
Step 5: trim the cases (if needed) #
With a set of calipers, check each case to see if the length matches the expectation. If it is too long, trim it (e.g. with the Lyman AccuTrimmer) and make the mouth clean with the Outside deburring tool and the Inside chamfer tool from the Lyman “Universal” Case Prep Accessory Tool Set. If it’s somehow too short, throw it away. You can check the CIP dimensions for the .30-30 Win cartridge here.
At the same time, make sure the brass is okay (no dents, holes, etc.) and if not, throw it away. Do NOT use a case which has any defect.
Step 6: lube the case #
Prepare the case for full-length resizing by applying a small amount of lube on the case mouth. Make sure NOT to put lube inside the case or on the neck. Doing so could respectively cause the powder to stick on the inside walls of the case and make dents on the neck of the case. Two things you absolutely want to avoid.
I personally use the Lyman Complete Case Lube Kit.
Step 7: full-length resize the case #
Use your full-length resizing die (make sure you’re not confusing it with the neck sizing-only die!) to resize the case.
If resizing is too hard, apply some lube to the middle of the case body. Don’t push too hard, or you might stick the case into the die, or worse, break the die!
Step 8: prime the case #
Before priming the case, I quickly check if the primer pocket is clean and in good condition. It’s rare that it’s not, but when it happens, I use the Large Primer Pocket Cleaner and the Large Primer Pocket Uniformer tool from the Lyman “Universal” Case Prep Accessory Tool Set.
Then, using the Lee Lever Primer System (which comes with the Lee Classic Turret Press) or a hand priming tool (e.g. the Lee New Auto Prime), seat a primer into the primer pocket. Make sure it is seated deep enough! To check if the primer is seated deep enough, just put the case vertically on a flat surface: the case shouldn’t wobble at all.
Step 9: drop a charge of powder #
BE FOCUSED for this phase because it is very critical as a double charge (or complete lack of charge) can be very dangerous and/or get you into a lot of troubles.
There are many ways to measure the quantity of powder:
- A powder measure and a scale (most time-consuming and error-prone method in my opinion, I would avoid it).
- A powder trickler (e.g. Frankford Arsenal Powder Trickler) and a scale (same, it can be interesting only if you want to very precisely weight the powder for long range shooting for example).
- The Lee Auto-Drum Powder Measure and its Lee Long Charging Die (much faster, although less precise, but still precise enough).
- Etc.
Step 10: check the charge of powder is correct #
Make sure the quantity of powder in the case is actually what you think it is! Here are a few methods:
- Weight the case before and after dropping the powder inside.
- Drop the charge into the pan on the scale and then transfer it to the case using a funnel.
- Weight a reference finished cartridge, then weight all the cartridges one by one once finished. Be aware the weights WILL differ from cartridge to cartridge because the cases are NOT all the same, but the difference should be small (it is up to you to decide a threshold).
If there is one step you shouldn’t skip, it is this one.
Step 11: seat the bullet #
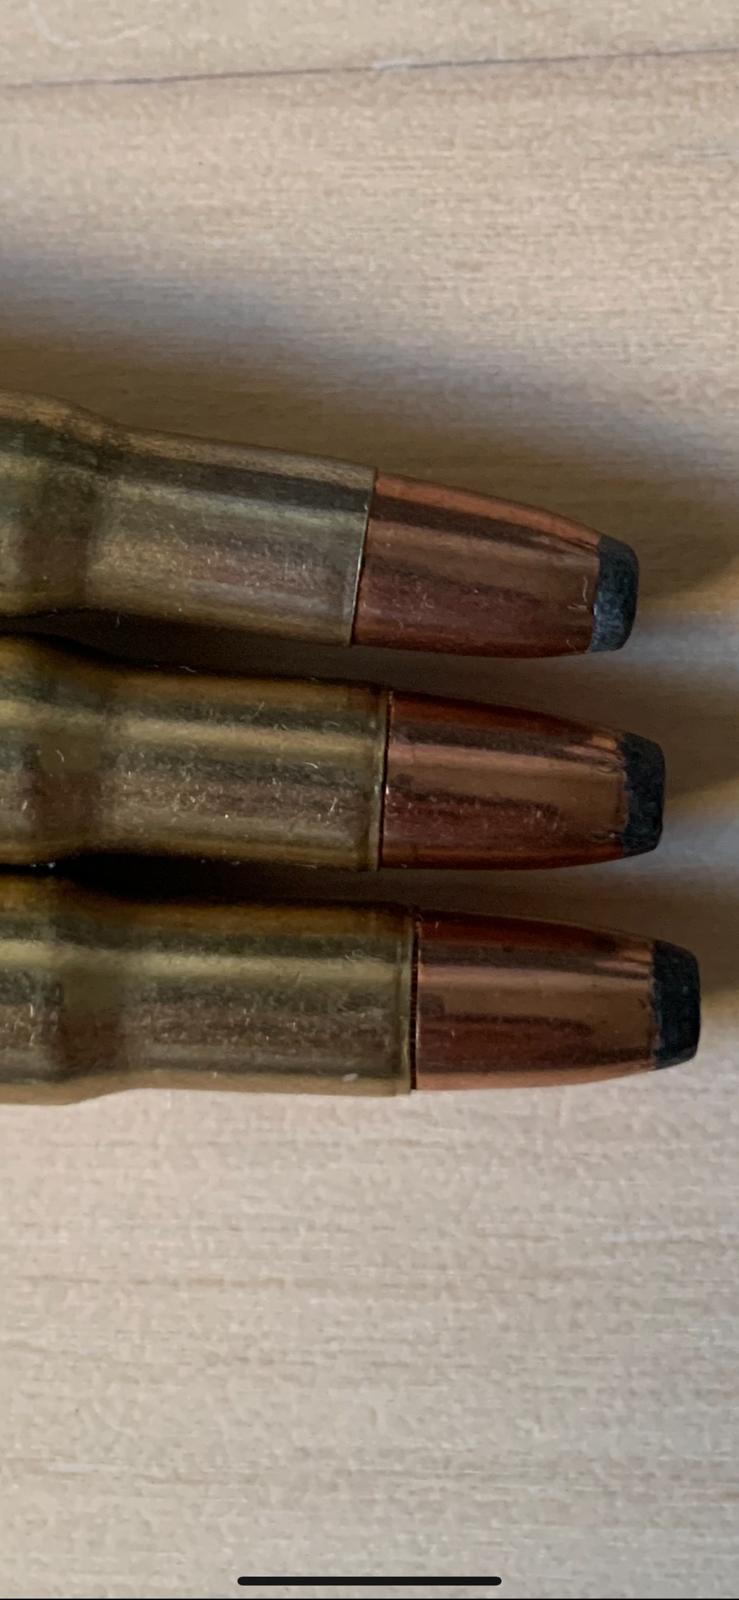
Seat the bullet in the case with the Lee Seating Die. If the bullet has a cannelure or crimp groove, make sure to seat the bullet so the case mouth will properly crimp on the cannelure/groove. See this picture to see how deep you should seat the bullet: the two bullets at the top are seated too deep because we can’t see the cannelure anymore. The bullet at the bottom is correctly seated/crimped in the middle of the cannelure.
Also, make sure the Cartridge OAL (Over-All Length) or “COAL” is below the required maximum CIP dimensions for the .30-30 Win cartridge.
Step 12: crimp the bullet (optional) #
If you intend to use a tubular magazine, then you NEED to crimp the bullet. If you don’t, the bullet could move because of the recoil or even fall completely into the case. You should apply a light crimp (about 1/4th of a turn on your Lee Factory Crimp Die), just enough to keep the bullet in place.
If you intend to feed the cartridges one by one, by hand, into the chamber, then it’s not necessary to crimp the bullet.
Crimping the bullet is an extra step which:
- Takes time.
- Wears the brass.
- Can potentially hurt the accuracy because it is hard to apply exactly the same crimp every time.
If you don’t need a crimp, I would recommend not to do one.
Step 13: quality checks #
Finally, for each cartridge, I:
- Visually inspect the cartridge for defects on the case, a bad seating depth, etc.
- Weight the cartridge to detect an odd charge (double charge, lack of powder).
- Measure the cartridge OAL to make sure it is below the maximum CIP OAL.
At this point, you should have ready to shoot cartridges! Congratulations!
Read also: